Introduction
This documentation will guide you to the startup process to create a SmartComponent in the
tt knowledge force environment. In the following example we create a new SmartComponent based
on an existing example. This SmartComponent gives an author the ability to display
an external picture file with a caption in the E-Learning view.
Verifying the configuration of tt knowledge force
SmartComponents is a part of the configuration of tt knowledge force. Depending in which
scenario you are working (Workstation or Client/Server Scenario) you have to handle the
configuration in a different way. Please ask the tool owner of your tt performance suite
about the scenario.
We recommend not using the factory configuration named 'initial'. This configuration will be
replaced in the case of updating the tt knowledge force and all individual developed
SmartComponents will be deleted.
Workstation ttkf 9.0 and 9.1
You have to choose the right configuration (the configuration of the customer). You find the settings
in the user preferences under the topic general/configuration.
If you want to create a new configuration you find an appropriate function in the local workspace on
the tab 'Templates' in the section 'Configuration'.
Client/Server Scenario
You have to choose the right configuration. You find the settings in the user preferences under the
topic general/configuration. You have to check out the configuration from the server. You find an
appropriate function in the local workspace on the tab 'Templates' in the section 'Configuration'. If
you have no access to the functions please ask the tool owner of tt performance suite
for the appropriate rights (Template Designer).
Creating folders and files
A SmartComponent is a composite of several files and they are located in two different folders, on
the one hand for the document editor and an on the other hand for the player of the E-Learning.
Definition of the SmartComponent
First we start with the initial definition of the SmartComponent in the folder for the document editor.
You have to choose a class name for your component in this step. This name should start with a
namespace like "org.example" or "com.mycompanyname". Please note that you have to observe
the naming guidelines for Java Script variables. We will use the name "org.example" in this example.
We recommend using "com.mycompanyname.componentname" for your project (e.g. tts uses
"com.tts." according to the naming guidelines for Java Script variables).
The files for the document editor define the component UI and component properties and
parameters to E-Learning author.
Course of action:
- Open the path
#User profile#\ttkf\cfg-#version#\ttn.kf\config#configuration name#\components\ - Create a new folder and name it to the components class name ("org.example.mypicture")
- Create two new text-files in the folder:
- metadata.js (The component definition file)
- ui.htm (The user interface file)
- If you want to use libraries for the UI-dialog you have to store them in the following path
#User profile#\ttkf\cfg-#version#\ttn.kf\config#configuration name#\libraries\
Class of the SmartComponent
The second step is to create the class, which establishes the SmartComponent in the player.
Course of action:
- Open the path
#User profile#\ttkf\cfg-#Version#\ttn.kf\content\config#configuration name#\components\ - Create a new folder and name it to the components class name ("org.example.mypicture")
- Create a new text-file files in the folder:
- component.js (The component class)
- If you want to use libraries for the component class you have to store them in the following path
#User profile#\ttkf\cfg-#Version#\ttn.kf\content\config#configuration name#\libraries\
Please refer to the specification for the folder structure, folder naming and file naming of the libraries: Integrating SmartComponents into the ttkf
Since 11.0. the ttkf provides a new export for HTML5 content. If you want to support that feature you have to create
Course of action:
- Open the path
#User profile#\ttkf\cfg-#Version#\ttn.kf\com.tts.player\configuration#configuration name#\components\page\ - Create a new folder and name it to the components class name ("org.example.mypicture")
- Create a new text-file files in the folder:
- component.js (The component class)
- If you want to use libraries for the component class you have to store them in the following path
#User profile#\ttkf\cfg-#Version#\ttn.kf\com.tts.player\configuration#configuration name#\libraries\
Please refer to the specification for the folder structure, folder naming and file naming of the libraries: Integrating SmartComponents into the ttkf
Defining a new component
The metadata.js defines a SmartComponent and the provided parameters. The example metadata
describes a component with the following behavior:
- ttkf UI-language support: english, german
- ttkf parameter: initial width, initial height, resizable
- Component-parameter: picture filename, caption
Course of action:
- Import the SmartComponent smartcomponent_getting_started.ttscp.
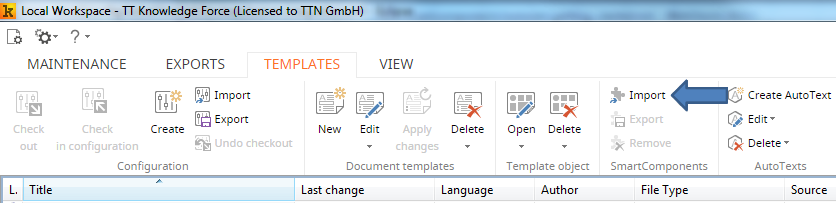
- Open the path
#User profile#\ttkf\cfg-#version#\ttn.kf\config#configuration name#\components\org.example.picture
and open the file metadata.js.
- Copy and paste the data of the example to your file in the folder org.example.mypicture.
- Change the property value name "en-us" : "Picture" to "en-us" : "MyPicture" and "de-de" : "Bild" to "de-de" : "mein Bild"
- Save the file.
Description of the metadata fields
category
Category name for the component in the SmartComponent menu. This name is used by the user
interface of the tt knowledge force and has multilanguage support. Simply use a ISO 3166 id with a
value for the derived language:
"de-de" : "german category name",

"en-us" : "english category name"
name
Name for the SmartComponent in the SmartComponent menu. This name is use by the user interface
and has multilanguage support. Simply use a ISO 3166 id with a value for the derived language:
de-de: german name of the SmartComponent

en-us: english name of the SmartComponent
version
Component version.
major: Major version

minor: Minor version

revision: Revision
parameter
Component parameters. Any parameter outside the "com.tts"-namespace will be passed thru the
component context.
"com.tts"
KnowledgeForce properties: These parameters are used by the authoring environment and you
cannot define new parameters in that namespace.
- width: Initial width of a component instance.
- height: Initial height of a component instance.
- scaling_mode: Scaling mode for the document editor in tt knowledge force, providing the following options: "fixed', "width', "height', "full'
- description: Name of the SmartComponent as it will be displayed in the object lists in tt knowledge force
- left: Position where to insert a SmartComponent into a TT document (given in pixels)
- top: Position where to insert a SmartComponent into a TT document (given in pixels)
- onlyVisibleInTemplateEditor: to show this SmartComponent only in the SmartComponent
menu of Template Editor view. Providing the following options: "true" and 'false'
Example for a parameter outside the "com.tts"-namespace.
"picture" : "test.png",

"de-de" : {

    "title" : "default title of the caption if the document language is German"

},

"en-us" : {

    "title" : "default title of the caption if the document language is English"

}
If there is another document language, where will be no default title.
Text parameters used like this are automatically included in the translation workflow of the TT
Knowledge Force.
Please note that this notation is different from the notation above concerning the category and the
name of the SmartComponent.
Create a user interface dialog
The ui.htm represents the authoring user interface for a SmartComponent. The example ui file
includes the following features:
Component-Parameter: Change and import the picture file with a ttkf-dialog, edit the caption of the picture
Buttons: Cancel and OK
See the GUIApi documentation for information about the provided UI functions.
Course of action:
- Open the path
#User profile#\ttkf\cfg-#version#\ttn.kf\config#configuration name#\components\ org.example.picture
and open the file ui.htm.
- Copy and paste the data of the example to your file in the folder org.example.mypicture.
- Optional: style the code with CSS.
- Save the file.
Create the component
See the Player API documentation for information about the provided Player API functions. You can
use the jQuery-framework (http://api.jquery.com) if it is declared in the dependencies.
Course of action:
- Open the path
#User profile#\ttkf\cfg-#Version#\ttn.kf\content\config#configuration name#\components\org.example.picture
and open the file component.js.
- Copy and paste the data of the example to your file in the folder org.example.mypicture.
- Optional: make changes to the code.
- Save the file.
Test your Component
Your new component is now ready to use.
Course of action: Preparation
- Create a new document
- Go to the "Insert" ribbon
- Click on the "Insert SmartComponent" Icon
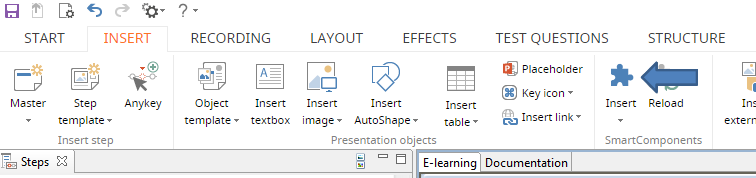
- Choose your component (The location in the menu depends on metadata.js properties "category" and "name")
Course of action: Testing the UI-dialog
- Double-click on the inserted component.
(the ui.htm will be shown, for testing the layout and the functionality of the ui of the properties dialog)
- Choose a picture file by using the "..."-button
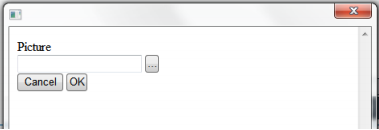
- Close the dialog
As a result you should see the selected picture with the caption on the stage named E-Learning in
the document editor. If you press play
Course of action: Testing the component in the authoring environment
- Click play to prove that the component works as designed in the authoring environment.
Course of action: Testing the component in the exported version (e-learning)
- Click play �. to export the e-learning
- Navigate via the tutorial panel to the appropriate page to prove that the component works as designed in the elearning, which will be published to the learner
Please keep in mind that the published e-learning may behave in a different manner, because the
source is transformed during the publishing process.
If you make any further changes in the component.js press Strg + F5 to reload the player in the
authoring environment.
Publish the new configuration
Depending in which scenario you are working (Workstation or Client/Server Scenario) you can
distribute the changes in the configuration in two different ways.
Workstation ttkf 9.0 and 9.1
To send the configuration to another instance of the tt knowledge force you have to export the
configuration. You find an appropriate function in the local workspace on the tab 'Templates' in the
section 'Configuration'.
Client/Server Scenario
You have to publish the configuration to the server. You find an appropriate function in the local
workspace on the tab 'Templates' in the section 'Configuration'.
Make changes to your component
Please execute the steps of chapter 2: Verifying the configuration of the tt knowledge force
Course of action:
- Open the component.js from your runtime configuration in an editor
- Make changes on the code
- Save the file
- Change to the document editor
- Press Strg + F5 to reload the player
The changes you have made should affect the component in the document editor. You can iterate to
this steps to develop your component.
Please note that changes on the metadata.js needs a restart of the tt knowledge force client.
Please execute the steps of chapter 6: Publish the new configuration.